The use of electronic signature software lets you and your online collaborators sign documents electronically. It doesn't matter whether you just want to sign a PDF occasionally or you want to offer your customers or clients the ability to sign electronically. While providing better customer experience and document management, the best e-signature tools automate and simplify your signature processes.
Sign.cc is one such tool from 500apps that lets you automate the document signing process with multiple signees. With it, you can manage and share contract documents easily across users, increase sales and proposal paperwork, close deals faster, and save money by focusing on the most important aspects of your business.
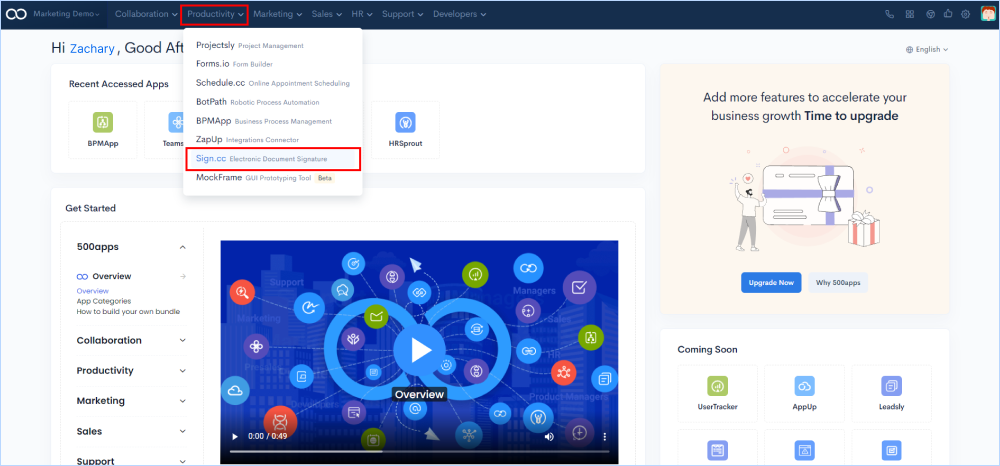
Go to infinity.500apps.com > Find Productivity on the top section of the suite > Select Sign.cc from the dropdown option under Productivity
Start adding new projects to the workspace by giving them a specific name, description, and unique icon.
Click on Create Project and find the window (Add Project) to give project details.

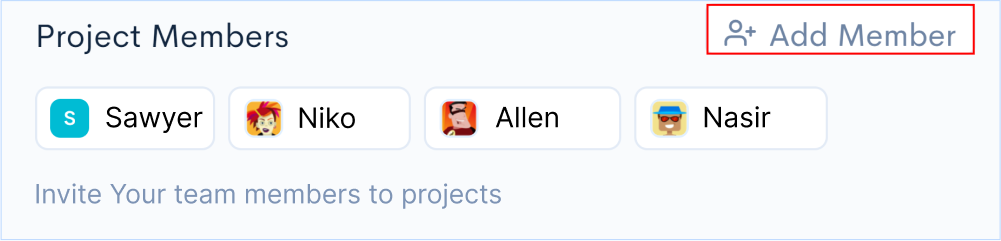
Add project team members from the existing list or invite them through the mail.
Click on Add Member from the Add Project window.
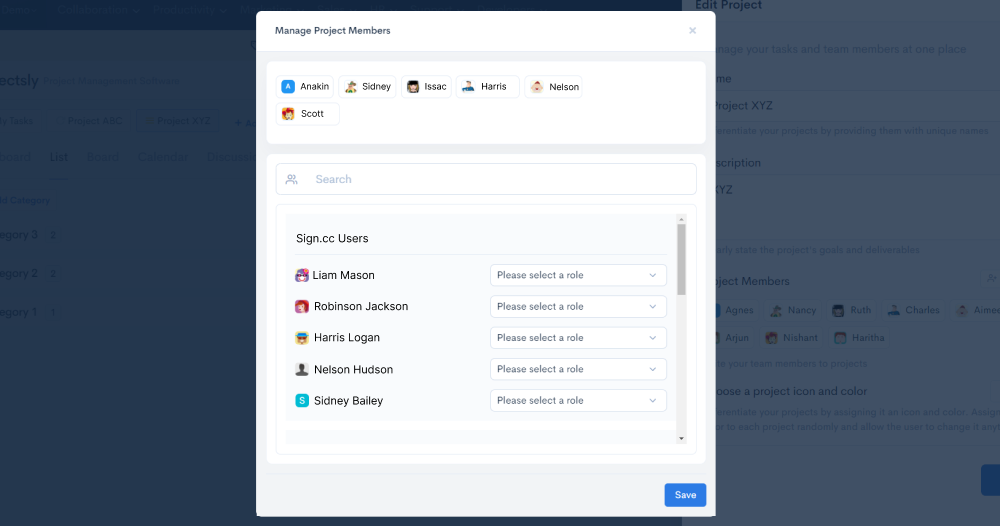
Assign specific roles to each member by adding them to the project. Once the members are chosen, click on Save.
You will enter into the workspace of Forms.io where you’ll be displayed with all features of the application.
If you want to make changes to the project you have created in terms of name, description, more members to be added or remove, you'll get the edit option to do the same. Hover over the project you have newly created and you'll find the Edit and Delete options. Click on the Edit button to make changes to the above mentioned details or click on the Delete button to remove the project you have created.

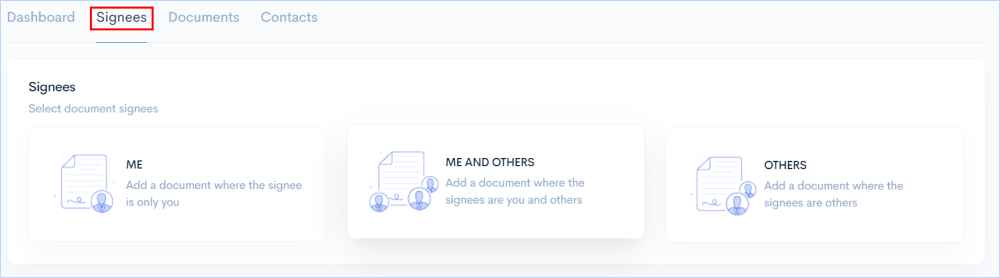
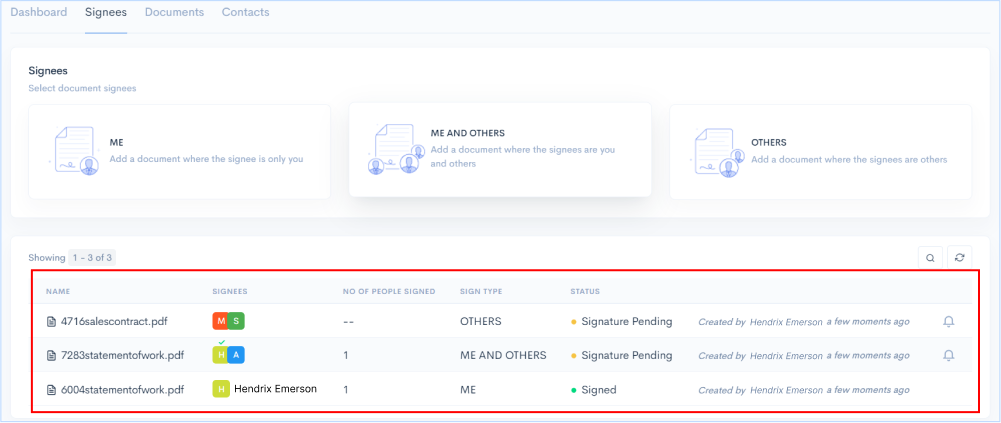
With Sign.cc, you can allow multi-party signing by sending the documents to multiple users. You will find options to select whom to sign the document you add - ME, ME AND OTHERS, OTHERS.
Sign.cc defines ME as the documents in which only you/owner is required to sign. For example - Document Attestation where you need to self-attest your documents. Manager Approvals
Sign.cc defines ME and Others as the documents in which the promisor and the promisee are required to sign. For example - Real estate documents, Supplier/Vendor Agreements, and Sales Contracts.
Sign.cc defines Others as the documents in which only promisee or customers are required to sign for example- New customer form, Employee Onboarding, Parental consent
Go to Signees in the features tab. Click the option you wish to implement.
Once you choose any option of signees you’ll get the section to either upload an already existing document from your system or from any cloud app.

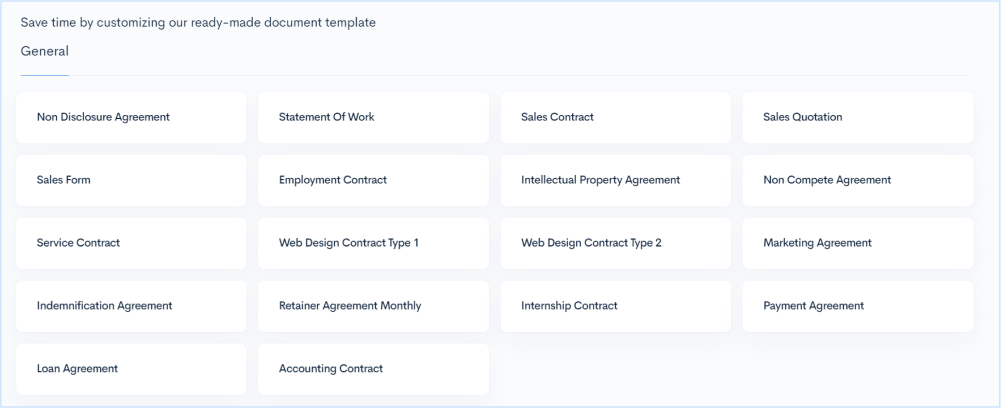
For added convenience, you can also select and start customizing from 15+ scenario-based pre-designed templates such as Non-disclosure Agreements, Intellectual Property Agreements, Service Contracts, and more. You can download them as a word file and even them in a new tab.
Down in the Signees section, you will be able to see any documents that you have chosen from the templates.
Sign.cc comes with a document editor with a list of powerful components. It is a simple drag-and-drop editor that allows you to add custom signatures, names and dates for the signees to sign.
To start with editing the document choose any template to work on by clicking on Use the template button while hovering over any template.

OR go to Documents in the features tab, go to any of the documents uploaded and click on the edit button on the right-hand side.
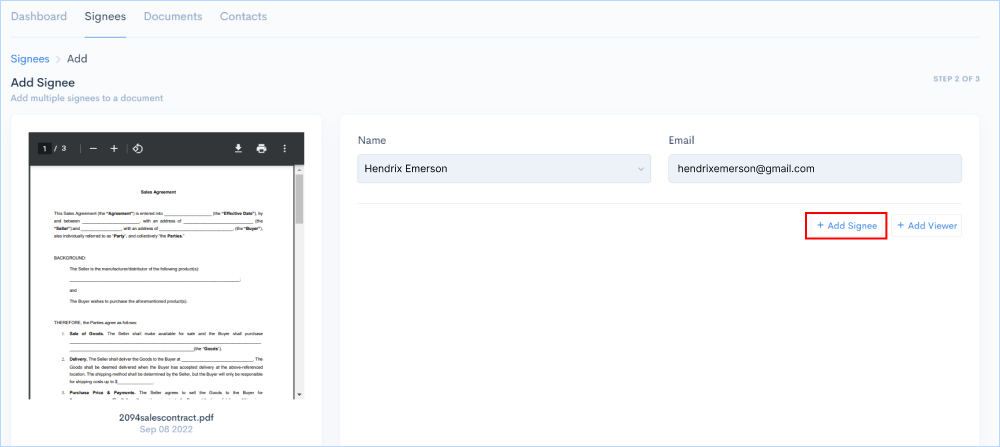
Invite members you wanted to add as signers to the document. Choose members from an existing list or add them manually by giving their contact names and email addresses.
Once the editor is opened, find and click the +Add Signee button. You’ll get the option to add the members as mentioned above.
Invite members you wanted to add as viewers to review the document. Add members manually by giving their contact information and email address or select them from an existing list.
Find and click the +Add Viewer button. You’ll get the option to add the members as mentioned above.

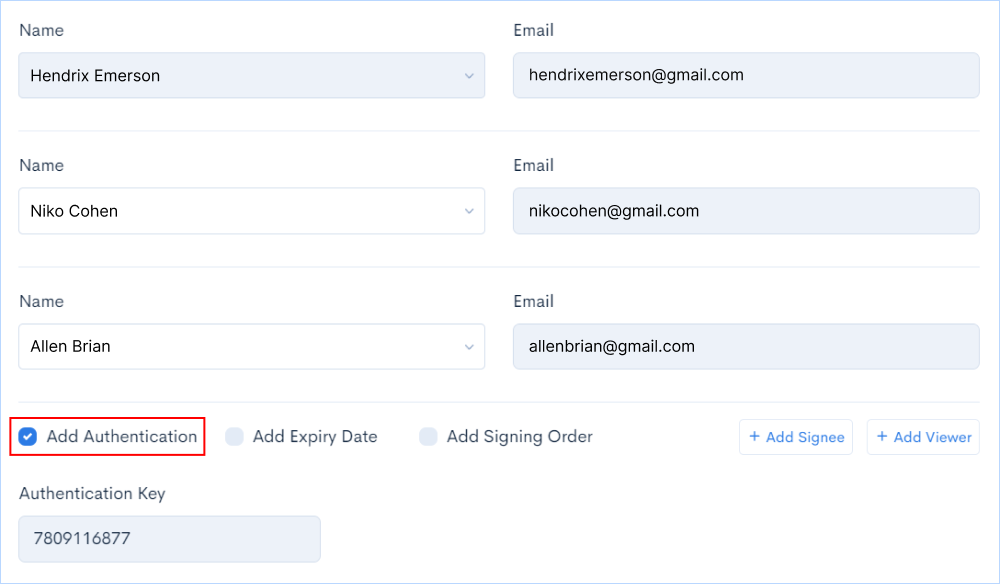
Secure your documents by adding authentication keys while sending them to the signers. Signers will receive an encrypted key in an email that can be used to open documents.
Find and click the Add Authentication button in the editor. You’ll be getting a 10-digit authentication key that will be sent to the signees.
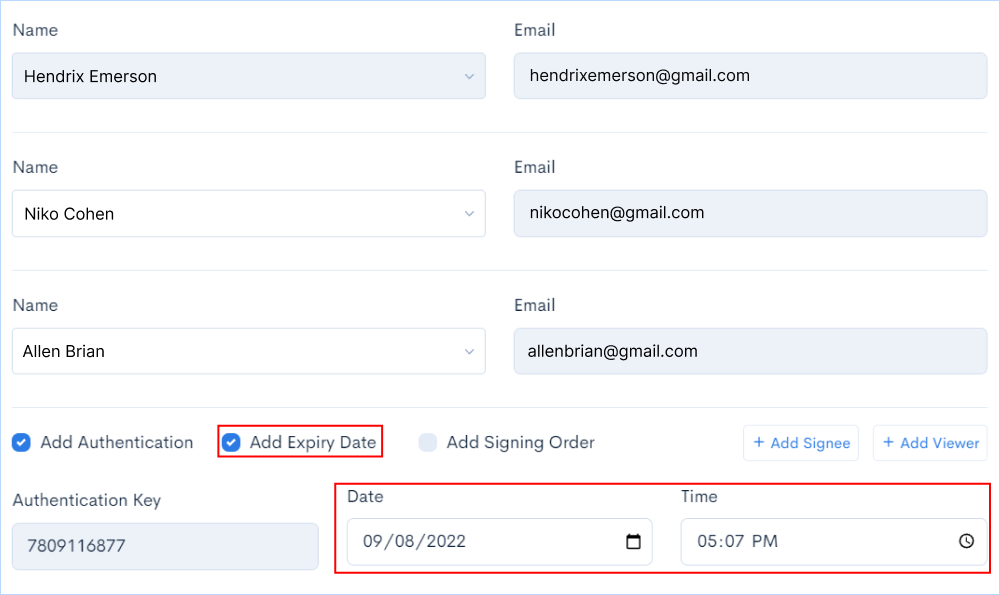
Establish a deadline for signers to sign the documents within which they must complete them. The date must be reset once it has expired for signees to be able to sign.
Find and click the Add Expiry Date button in the editor. Set the date and time in the respective boxes displayed.
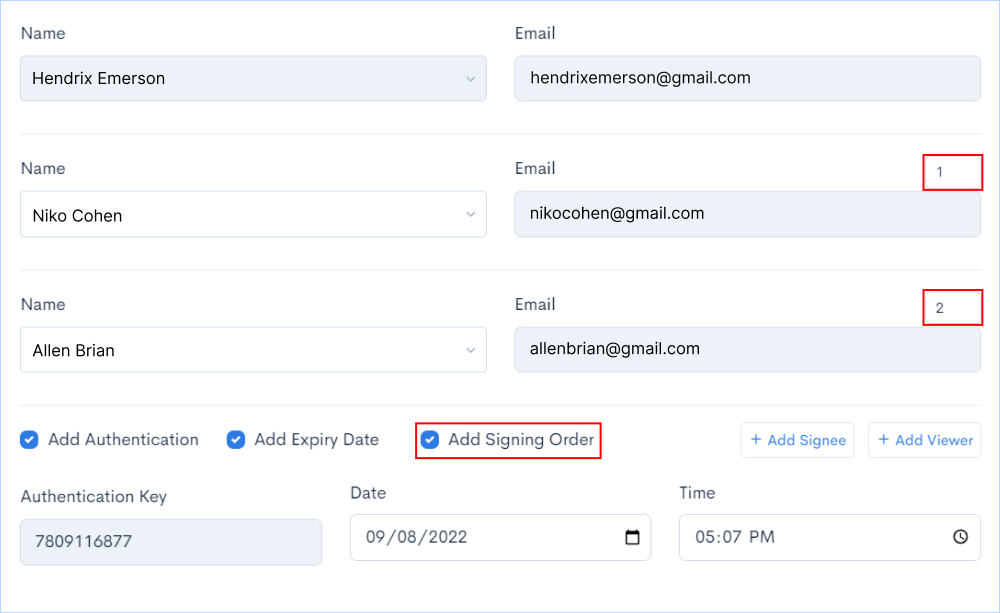
When you add more recipients to the document, you can choose to set a signing order. You can control the order in which your recipients receive and sign your documents using the signing order. The document will be sent to the first recipient through mail based on the signing order, and when he submits his sign, the second recipient will receive the mail for the same, and it continues.
Find and click the Add Signing Order button in the editor. Boxes will be displayed next to the signees’ tabs to fill the order of signing.
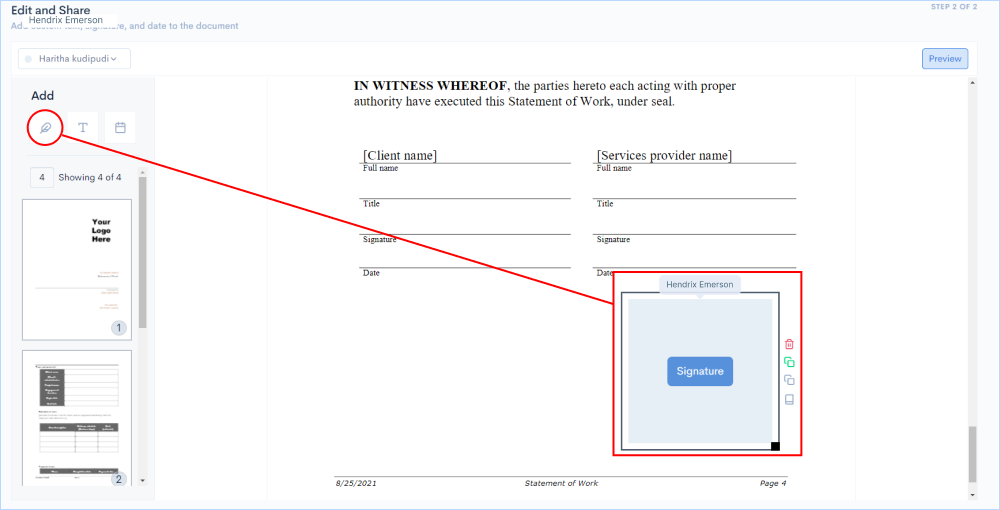
Once you are set with signees, signing order and other parameters go to the next stage of adding signature selections for signees to sign the document. To move to this part of editing click on the Next button on the right bottom of the editor. You will be taken to the document view where you can start adding the elements to the same.
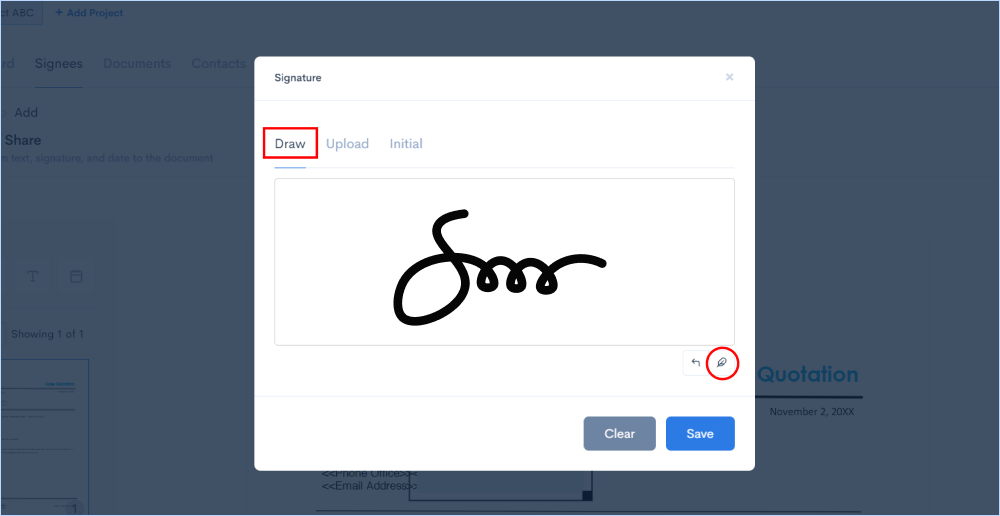
To start adding the signature block, first select the signee from the top right drop-down of the editor. Having chosen the signee, drag the signature component from the editor and drop it in the specific section of the document where you want the signee to sign.
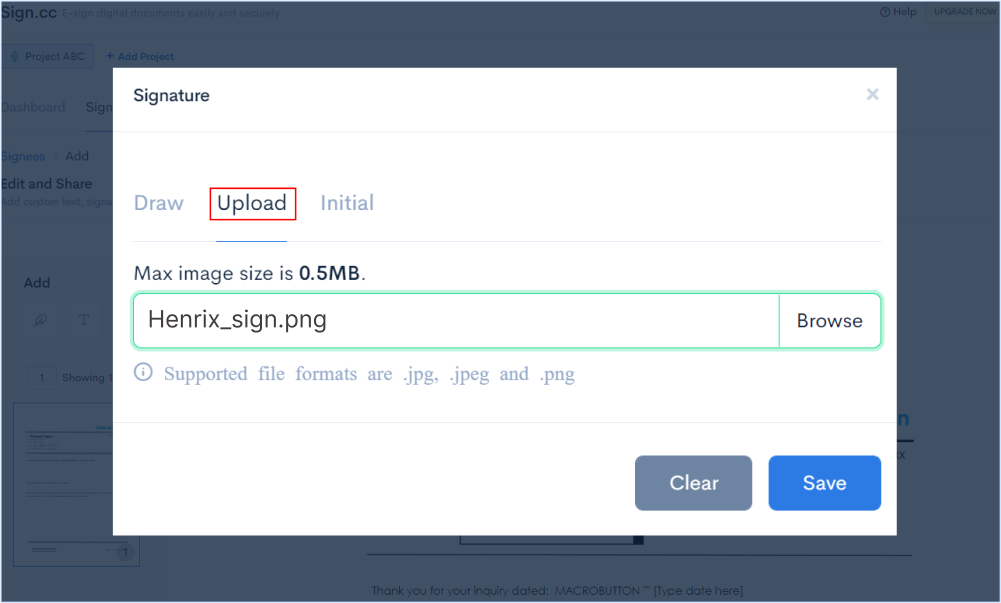
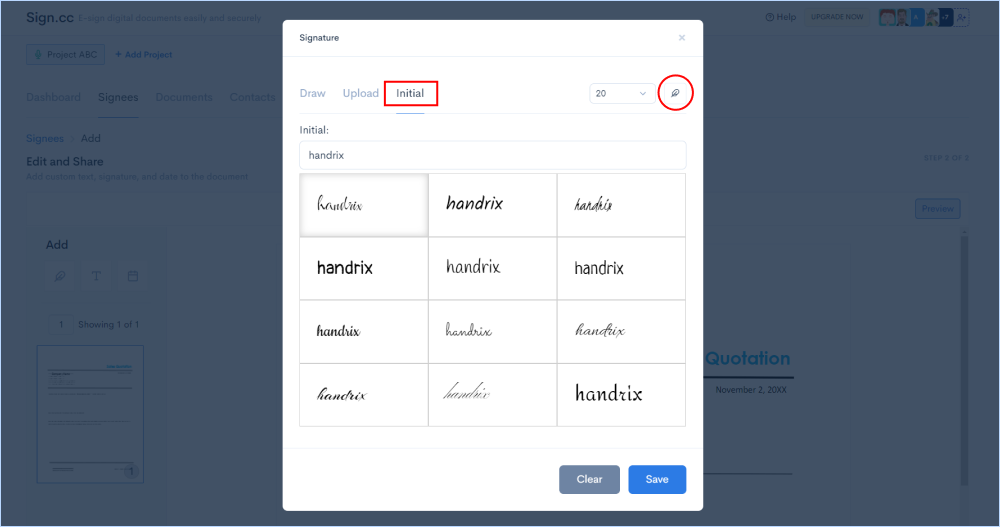
Make personalized signatures using the themes provided by Sign.cc. During the signing workflow, you can select an appearance from your library of appearances from which to choose. You can even draw signatures manually or upload them from your system.
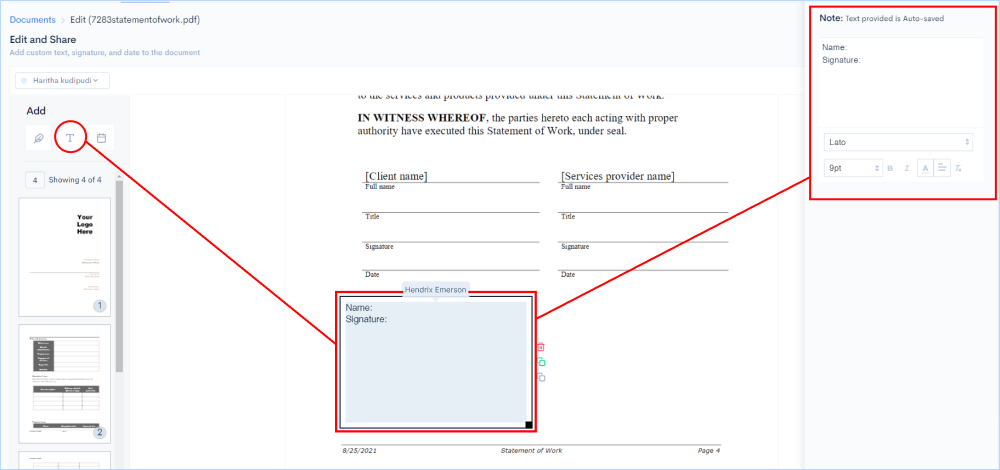
You can add text blocks where you want the signee to fill in specific details being asked. For this, drag the Text component from the editor and drop it in the specific section of the document where you want the signer to add details.
The document is ready to be sent to the signees once you have edited it and added the necessary elements and blocks. Click on the Submit button on the right bottom of the editor.
The document will be automatically sent to mail in the same signing order being set.
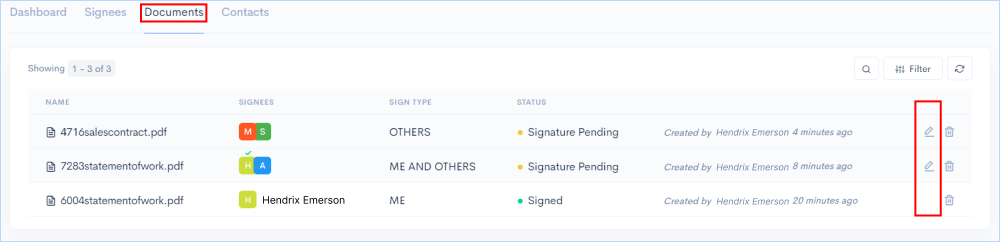
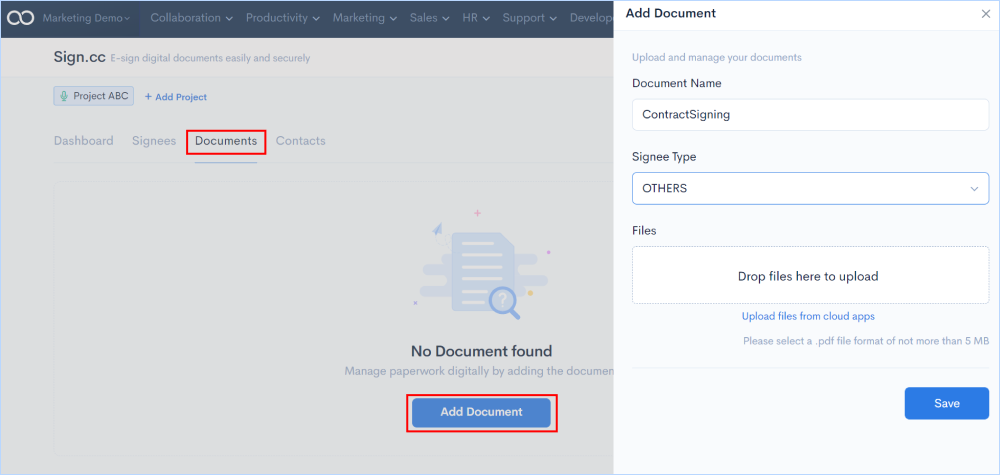
The documents that have been created and send to users from the Signees section will be getting populated in the Documents section. You can also start adding new documents of any scenario to get them signed by you and others and save them in one central location.
To add new documents, go to Documents in the features tab > Click on Add Documents. You will get a window where you can upload pdf documents from your system or from any cloud app. You can also give a specific name and description for the uploaded documents along with signing type (ME, ME AND OTHERS, OTHERS - which will be explained later)
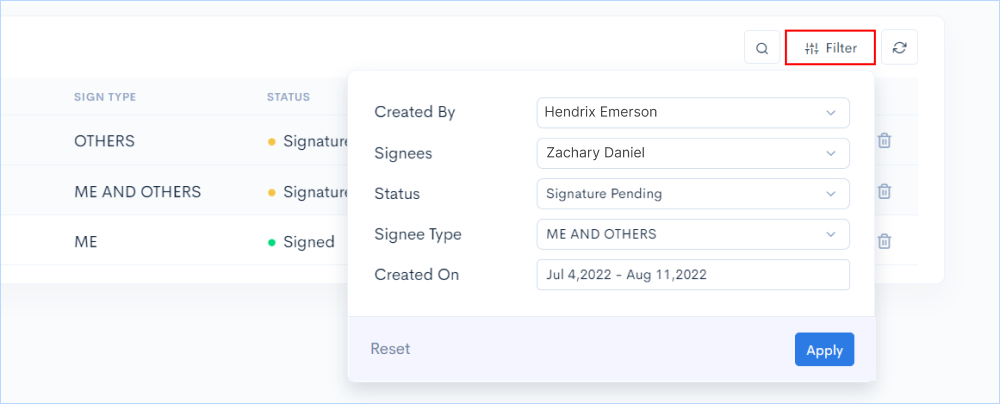
A repository of documents to be signed or already signed can be created that can be accessed at any time. You will get the details for each document such as Signees, Sign Type, Signed Status, etc.

The signing status of individual signees for each document will be displayed in 2 ways: 1) A green tick above the names of individual signees, 2) Displayed in text format in the tab of each document as Signed, Signature Pending or Draft.
![]()
Filter and search documents by Owner, Signee, Sign Type, Status, Date created. Reset the filters and start over with your search criteria by clicking the reset button.
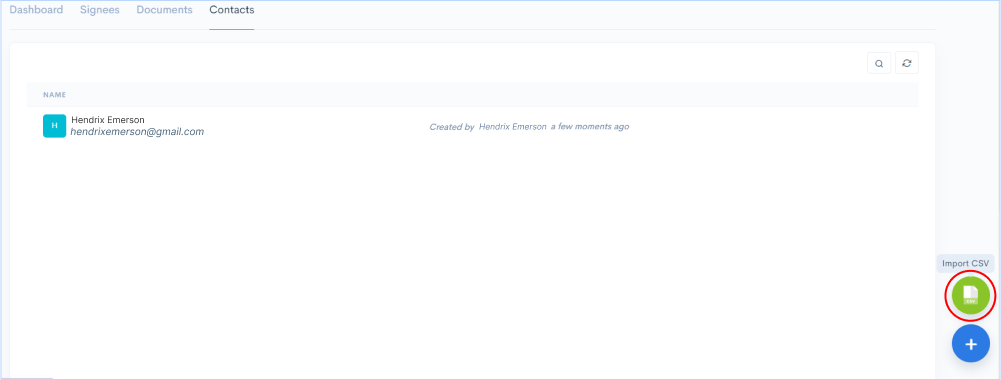
You can add contacts who can sign the documents you prepare and maintain a repository for easy access. You can either start manually adding the contact details by giving specific names and email IDs or you can import contacts from spreadsheet.
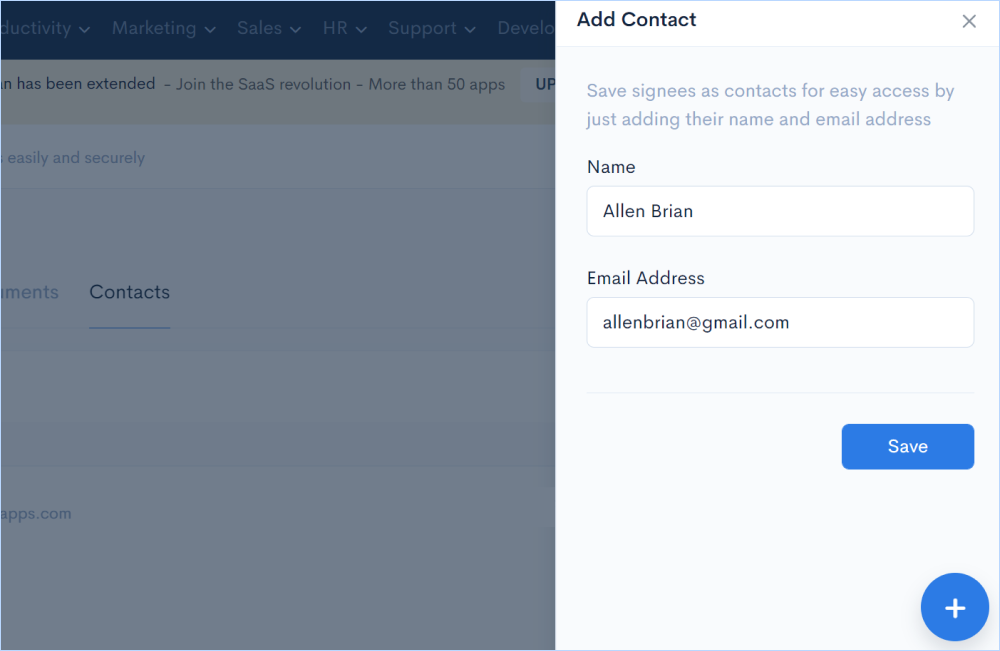
Go to Contacts in the features tab > click on the ‘+’ on the right bottom of the screen.
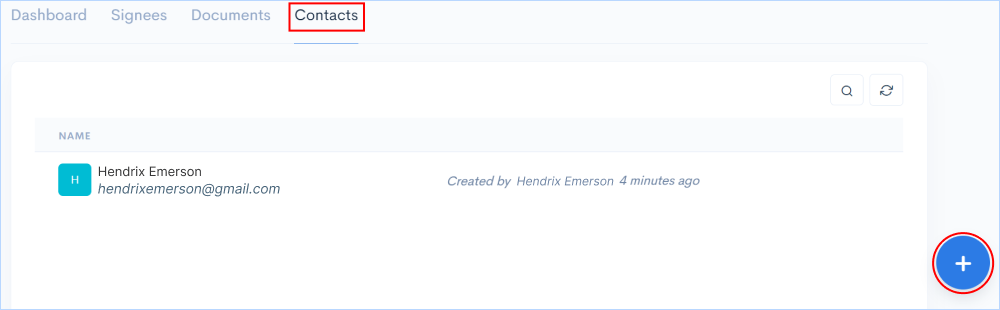
You will get a window to add name and email addresss of the contact to be saved. Provide the inputs and click the Save button.
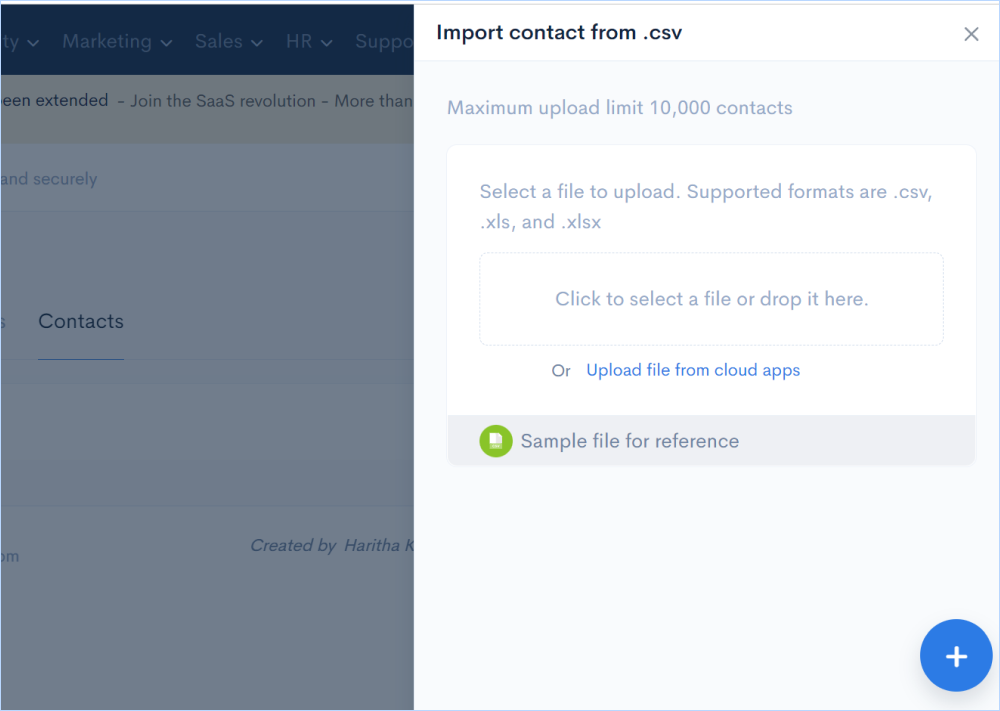
You can import maximum of 10,000 contacts from spreadsheet (.csv, .xls, and .xlsx) instead of manually adding them to the Contacts section. A reference sheet will be given to follow the same format to import the contacts.
Click on the Import CSV icon on the right bottom corner of the Contacts section.
You will get a window to import file either from the system or from any cloud app.
You can also edit the details of the contacts by clicking on the edit option on the right side of each contact tab.

Get critical reporting and metrics information with Sign.cc’s Dashboard, which displays real-time data on documents created, signed, pending status and more.
Go to Dashboard in the features tab to get advanced reports.
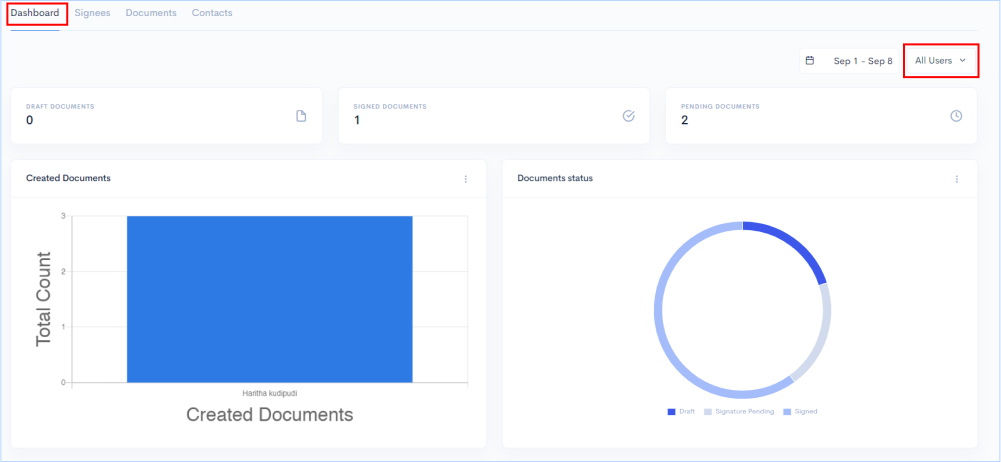
You can filter the data based on individual users by selecting the drop-down showing user names on the top right corner of the screen.
Go to the next level with ![]()
Get 50 other apps with Sign.cc - Join the SaaS Revolution - 500apps, $14.99/user flat pricing, 24/5 Support (Phone/Email/Onboarding)
